A Simple Guide to Animating Chaos Vehicles with Spline Follow Components in Unreal Engine
Introduction to Chaos Vehicles in Unreal Engine
If you’ve ever been intrigued by the prospect of creating realistic and dynamic vehicle animations but felt overwhelmed by the myriad options available, you’ve come to the right place. We have all seen the Chaos Vehicle demo for UnrealFest 2022, but the demo needed information on how to use it with animation sequencers. This guide will demystify the essential components like Chaos Vehicles and Spline Follow Components, providing a step-by-step tutorial to elevate your animation projects with simulated physics. This would be an ideal tutorial for beginners looking to dip their toes into Unreal Engine’s animation capabilities or an experienced animator keen on leveraging advanced techniques.
Part 1: The Basics
What Are Spline Follow Components?
In Unreal Engine, Spline Follow Components is a component created by Stephen that allows actors to navigate a predefined spline curve smoothly. This component provides a host of adjustable parameters for controlling speed, orientation, and behavior, making it invaluable for creating realistic and dynamic animations. Whether you’re new to Unreal Engine or an experienced animator, this user-generated component by Steve adds another layer of sophistication and flexibility to your animation toolkit. For a more in-depth explanation, check out Stephen’s original post.
Part 2: Getting Started with Chaos Vehicle
Setting Up Chaos Vehicles: An Overview and Resources to Follow
In the world of Unreal Engine, Chaos Vehicles offers a robust framework for realistic vehicle simulations. However, the journey begins before you hit Unreal’s ‘simulate’ button. It starts with setting up the proper armature in a program like Blender and importing the FBX files into Unreal. Here’s a quick overview and some resources to guide you through this multifaceted process:
- Blender Tutorial for Armature Setup: The first step in animating your Chaos Vehicle in Unreal Engine starts in Blender. Instead of using the plugin, please go through [UE4 Vehicle Rigging Addon for Blender v0.5 Update]. It’s a detailed tutorial that will guide you through the intricacies of setting up the armature (rig) for your vehicle model in Blender. By the end of it, you’ll have a vehicle model in FBX format ready for import.
- Importing FBX into Unreal: After your model is prepped and ready in Blender, importing it into Unreal Engine is the next step. Here, we’ll turn to Unreal Engine’s step-by-step documentation for importing FBX files. This is an essential phase as it bridges the gap between your 3D modeling software and Unreal Engine. Make sure to follow each step carefully to avoid any technical glitches. In any case, if follow through the docs doesn’t give you enough clarity, you can also watch this tutorial: [How to set up primary vehicle in Unreal Engine 4]
I will create a video soon to go over this in detail.
Implementing Spline Follow Components (A Sample by Stephen Phillips)
Stephen’s post outlines creating and implementing a versatile Actor Component in Unreal Engine, aptly named the FollowSplineComponent, to make any actor animate along a spline. Below are the steps involved and the attributes you’ll need to alter:
- Create Actor Component: Instead of putting all the logic for spline-following behavior in a Blueprint Actor, Steve created an Actor Component for maximum flexibility. This can be attached to any Actor in the Unreal Engine world.
- Target Spline Actor: The BP_TargetSpline Actor is created, essentially your path for the actor to follow. It has a single Spline component with minimal modifications.
- Auto Find Spline: This logic is implemented during the EventBeginPlay and helps to find the nearest spline actor in the world automatically. You can manually override this.
- Distance Along Spline: It records the actor’s position on the spline in terms of both centimeters and percentage relative to the total length of the spline.
- Update Destination: This function determines the next point on the spline that the actor should aim for based on a custom distance variable set ahead of the actor.
- Proceed to Destination: This function handles the actual movement of the actor, accommodating different types of actors such as vehicles, pawns, and static meshes. It employs various Unreal Engine functionalities like Add Movement Input and Set Rotation.
- Debugging: Steve uses debug spheres and text render components to aid debugging and demonstration.
To add the FollowSplineComponent to an actor in your current level, select the actor and click the + Add button in their details panel. Here, you can edit all the settings related to the FollowSpline component.
For a more detailed visual guide on implementing the FollowSplineComponent, Tony Bowren has created a tutorial that can be viewed here: Tony Bowren’s FollowSpline Tutorial.
With these steps and attributes, you can successfully implement the FollowSplineComponent in your Unreal Engine project for various use cases, from simple path-following to complex animations.
Part 3: Techniques to Bring into Sequencer
Bringing Chaos Vehicle and Spline into Sequencer
Building on Tony Bowren’s method of animating a vehicle in a linear fashion in Unreal Engine, there are valuable insights into how you can take your car animation to the next level by integrating Chaos Vehicle and Spline functionalities into the Sequencer. Tony begins his tutorial by acknowledging Stephen Phillips’ dev post as the basis for his approach. He suggests you start by downloading the example project, including some spline examples with cars, people, and boxes.
Scene Setup and Key Components
In Tony’s tutorial, the starting point for the scene contains only a target spline blueprint. You’ll want to insert a default car, such as the ‘sports car pawn,’ into your scene. The pivotal aspect here is the ‘follow spline’ component that can be added to the car. You’ll need to specify some essential parameters like ‘throttle’ and ‘look ahead’ distance to get the car to move along the spline.
Incorporating Chaos Vehicle and Spline Functionality
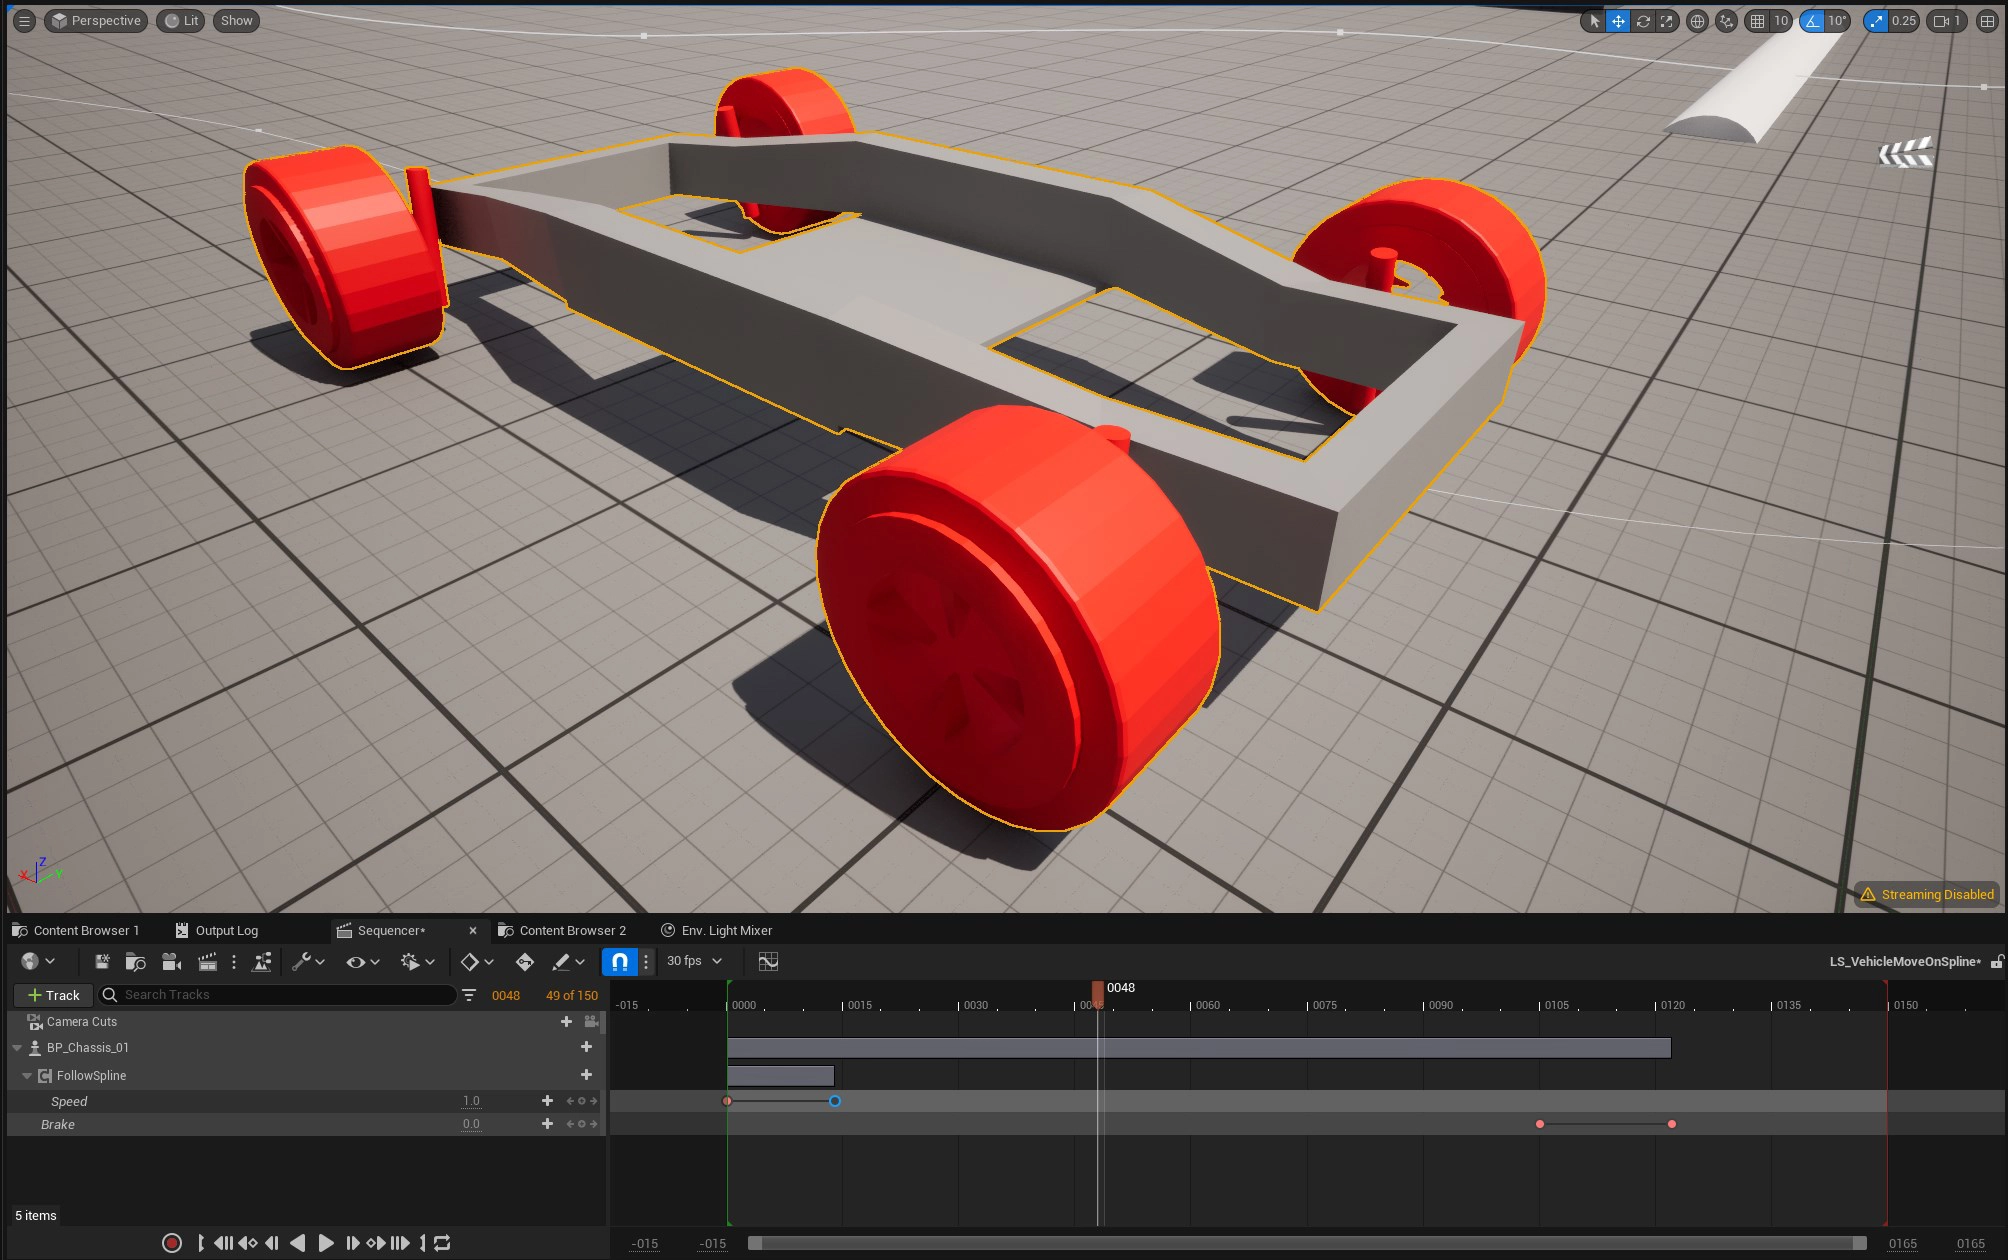
What makes Tony’s approach compelling is how he expands the basic functionality to include greater control over the animation. He introduces two key variables: Speed and Brake. Make sure these variables are Expose to cinematics. These are exposed to the Sequencer, thus allowing real-time control over the vehicle’s throttle and braking mechanisms. Doing so gives you granular control over the car’s movements, making the animation more predictable and more accessible to scrub through.
Level Sequencing for Controlled Animation
A new level sequence is created in the Sequencer, where the car is added to allow its properties to be animated over time. To achieve complex animation behaviors, you can keyframe the ‘Speed’ and ‘Brake’ parameters at this stage. You can make the car stop, speed up, or even hit the brakes at specific keyframes, synchronizing to your animation timeline.
Recording Takes with Take Recorder
Tony elaborates on the Take Recorder’s capabilities to capture your sequenced animation for later use or modification. To capture the exact sequence, you can include your level sequence as a source for the Take Recorder, triggering the play during recording. This ensures a high level of repeatability and allows you to fine-tune your animation.
Real-time Adjustments and Regeneration
The benefit of this method lies in its flexibility. If you need to make changes, you can return to your original level sequence, adjust the spline path or the keyframed ‘Speed’ and ‘Brake’ curves, and regenerate the animation. This makes it a robust solution for complex vehicle animations, filling a unique spot between manual and in-engine gameplay-based animation.
Following Tony Bowren’s approach and implementing these essential elements, you can produce intricate vehicle animations in Unreal Engine, seamlessly integrating Chaos Vehicle and Spline functionalities into the Sequencer for more dynamic and controlled animations.
Part 4: Problem-Solving
Troubleshooting Common Issues in Chaos Vehicle Animations
Animating Chaos Vehicles can be complex, but common issues often have straightforward solutions. Here are some quick fixes for typical problems:
- Import Errors with FBX FilesSolution: Check Blender’s export settings and Unreal Engine’s import specs to resolve compatibility issues.
- Chaos Vehicle Doesn’t Follow Spline
Solution: Verify Spline Follow Component settings and the targeted spline actor.
-
Real-time Adjustments Not Reflecting in Sequencer
Solution: Clear cached sequences in Unreal Engine and replay the animation.
-
Jittery or Unnatural Animation
Solution: Adjust frame rate settings and Sequencer’ Interpolation’ for smoother motion.
-
Take Recorder Issues
Solution: Confirm your level sequence is set as the Take Recorder source and all properties are set to record.
-
Unrealistic Chaos Vehicle Physics
Solution: Ensure the Chaos physics engine is enabled and properly configured.
By understanding these quick fixes, you can more effectively navigate the complexities of animating Chaos Vehicles in Unreal Engine.
Conclusion
Embracing Chaos Vehicles and Spline Follow Components in Unreal Engine elevates the realism and dynamism of your vehicle animations and offers a streamlined workflow. You can produce stand-out animations by overcoming common issues and leveraging advanced techniques. Choose Chaos Vehicles for a modern, flexible approach over traditional methods.